Starting seeds indoors is a crucial technique for gardeners who want to extend their growing season, experiment with unique plant varieties, or simply save money. This comprehensive guide will walk you through everything you need to know—from the benefits of indoor seed starting to the nitty-gritty details of sowing, growing, and transplanting your seedlings. Whether you’re a seasoned gardener or just getting started, this guide will help you succeed in growing strong, healthy plants from seed to harvest.
Why Start Seeds Indoors?
Starting seeds indoors offers numerous advantages, especially for gardeners dealing with short growing seasons or unpredictable weather. Here’s why this method is a game-changer:
- Extended Growing Season: Indoor seed starting allows you to get a head start on the growing season, which is especially important for warm-season crops like tomatoes, peppers, and eggplants. By the time the weather is warm enough, your seedlings will be strong and ready to thrive outdoors.
- Wider Variety: Seeds offer a broader selection of plant varieties, including heirlooms and unique crops that you might not find as transplants at your local nursery. This means you can grow exactly what you want, whether it’s a rare tomato variety or a flower in a specific color.
- Cost-Effective: Seeds are generally much cheaper than buying mature plants. Starting seeds indoors allows you to grow more plants for less money, which is particularly beneficial if you have a large garden.
- Healthier Plants: When you start seeds indoors, you have complete control over the growing conditions, leading to healthier seedlings. You can ensure they’re not exposed to pests or diseases, and you can provide the perfect environment for them to thrive.
- Personal Satisfaction: There’s something incredibly rewarding about nurturing a plant from a tiny seed to a mature, fruit-bearing or blooming specimen. It deepens your connection to your garden and enhances your gardening skills.
When to Start Seeds Indoors
Timing is critical when starting seeds indoors. Start too early, and your seedlings may outgrow their pots before the weather is suitable for transplanting. Start too late, and your plants may not reach maturity in time. Here’s how to get it right:
- General Timing: Most seeds should be started indoors about 6-8 weeks before the last expected frost in your area. This gives the plants enough time to grow and develop before being transplanted outdoors.
- Check Seed Packets: Always read the seed packet instructions. They typically provide specific guidance, such as “start indoors 8-10 weeks before the last frost.” This is your best source of information for each plant type.
- Use Tools: Use AiFarming or a planting calendar to determine your last frost date. Count backward from this date to find the best time to start your seeds.
- Consider Soil Temperature: Soil temperature is a more accurate predictor of germination success than air temperature. For instance, tomatoes germinate best in soil that’s between 70°F and 85°F. Using a soil thermometer can help you fine-tune your planting schedule.
Which Seeds Should You Start Indoors?
Not all seeds should be started indoors. Some do better when sown directly into the garden, while others need the controlled environment that indoor seed starting provides.
- Best Seeds for Indoor Starting:
- Vegetables: Tomatoes, peppers, eggplants, broccoli, cauliflower, and cabbage.
- Flowers: Petunias, marigolds, and snapdragons.
- Herbs: Basil, parsley, and dill.
- Seeds to Direct-Sow Outdoors:
- Root Vegetables: Carrots, beets, radishes, and parsnips, as they don’t like having their roots disturbed.
- Fast-Growing Plants: Peas, beans, and lettuce, which can be sown directly into the garden once the soil is warm enough.
- Special Cases:
- Tender Vegetables: Crops like cucumbers, melons, and squash are often better direct-sown because they don’t transplant well. However, in colder climates, you might still start these indoors but handle them very carefully when transplanting.
How to Start Seeds Indoors: Step-by-Step
Starting seeds indoors is a straightforward process when you follow these steps:
1. Gather Your Supplies
Before you begin, make sure you have all the necessary supplies on hand:
- Seeds: Choose high-quality seeds from a reliable source.
- Containers: Use seed starting trays, plug trays, or repurposed containers like yogurt cups with drainage holes.
- Seed Starting Mix: A fine, sterile mix designed specifically for seed starting is best.
- Labels: Plant markers and a permanent marker to label your seeds.
- Watering Tools: A spray bottle or watering can with a fine rose nozzle.
- Light Source: Grow lights or a sunny, south-facing window.
- Heat Mat (optional): To maintain consistent soil temperature.
2. Prepare Your Seed Starting Mix
- Moisten the Mix: Place the seed starting mix in a large tub or bucket. Gradually add water while stirring until the mix is uniformly damp, like wet sand.
- Fill the Containers: Fill your containers with the moistened mix, leaving about 1/4 inch of space from the top.
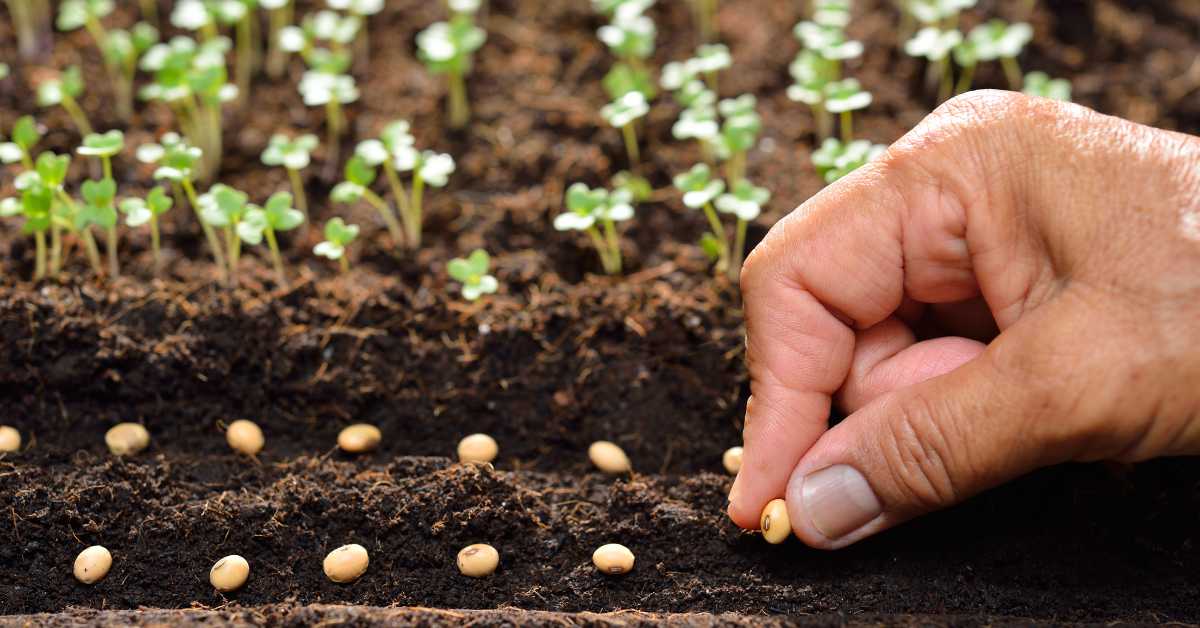
3. Sow Your Seeds
- Planting Depth: Plant each seed at a depth that’s twice its size. Tiny seeds like basil can be pressed into the surface, while larger seeds like beans should be covered with more mix.
- Spacing: Sow 2-3 seeds per cell or container to ensure germination. You can thin them later if necessary.
- Labeling: Immediately label your containers with the plant name and sowing date.
4. Provide the Right Conditions
- Cover: Cover your containers with a humidity dome or plastic wrap to maintain moisture and warmth.
- Heat: Place the trays in a warm location, ideally between 70°F and 85°F. A heat mat can be very helpful here.
- Light: Once the seeds germinate, move the seedlings to a light source. Use grow lights or place them in a bright window where they can receive 12-16 hours of light daily.
5. Watering and Care
- Watering: Keep the soil consistently moist but not waterlogged. Water from the bottom by placing the containers in a tray of water and letting the soil absorb it.
- Thinning: Once seedlings have developed their first set of true leaves, thin them by snipping off the weaker seedlings at the soil level, leaving the strongest one in each pot or cell.
Transplanting and Hardening Off
After several weeks, your seedlings will be ready for the next stage—transplanting into larger pots or directly into the garden. Here’s how to do it:
1. Transplanting
- When to Transplant: Seedlings are ready to be transplanted when they have two sets of true leaves.
- Preparing New Pots: Fill larger containers with an all-purpose potting mix. Make holes large enough to accommodate the seedling’s roots.
- Transplant Carefully: Handle seedlings by their leaves, not stems, to avoid damage. Plant them deeper than they were in the seedling tray to encourage strong root development.
2. Hardening Off
- Start Gradually: About 7-10 days before transplanting outdoors, start placing your seedlings outside in a shaded, protected area for a few hours each day, gradually increasing their exposure to sunlight and outdoor conditions.
- Increase Exposure: Each day, leave them outside for longer periods and expose them to more sunlight. By the end of the hardening-off period, they should be able to stay outside all day and night.
3. Final Transplanting
- Timing: Transplant your seedlings into the garden after the last frost date and once the soil has warmed up. Choose a cloudy day or late afternoon to reduce transplant shock.
- Spacing: Follow the spacing recommendations on your seed packets to ensure each plant has enough room to grow.
- Watering: Water thoroughly after transplanting and continue to monitor the plants closely during their first few days in the garden.
Tips for Success
- Don’t Start Too Early: Starting seeds too early can result in leggy, root-bound plants. It’s better to start a little later than too early.
- Use Grow Lights if Necessary: If your home doesn’t have enough natural light, invest in a set of grow lights. Keep them close to the seedlings (about 4-6 inches above) and on for 12-16 hours a day.
- Keep an Eye on Pests: Even indoors, seedlings can fall prey to pests like fungus gnats. Keep the area clean, avoid overwatering, and use yellow sticky traps if needed.
- Be Patient: Germination times vary by plant, so don’t panic if some seeds take longer to sprout. Keep the conditions consistent and give them time.
Final Thoughts
Starting seeds indoors is not only a practical gardening technique but also a deeply satisfying experience. Watching tiny seeds sprout and grow into healthy plants under your care is one of the most rewarding aspects of gardening. By following this guide, you can confidently start seeds indoors and set your garden up for a bountiful season. Whether you’re growing vegetables, herbs, or flowers, you’ll enjoy the process from seed to harvest, knowing that you’ve played a vital role in every stage of your garden’s development.
Happy gardening!